This is what I call "the gateway drug" of nail art. It was one of the first semi-complex things I tried, and I instantly fell in love. It appeals to my imprecise nature. You can't mess this up. If it doesn't look right, just go over it again!

Step One: Remove your current polish.
It's best to start with clean, dry nails. No matter how sad it makes you to see them in their naked state.
Step Two: Base Coat, Color, and Top Coat
I applied my base, one coat of China Glaze Liquid Leather, and a coat of Seche Vite. Who has time to wait for polish to dry these days?

Step Three: Start blotting!

If you find that you are picking up too much polish, you can always add a little base coat, and blot against your foil.

Then lather, rinse, repeat with the rest of your chosen colors. I generally go from lightest-to-darkest, then I add a touch of white here and there to the top.

Once the color adding is complete, your "palette" will look something like this.

Step Four: Shaping

Step Five: Stars


Often, I add China Glaze Fairy Dust, a holographic polish, or some spectraflair topcoat here and there. It's up to you if you want glitter or sparkle. This was a quickie galaxy, so I didn't bother. I spent about 30 minutes doing this one, including photographs and dry time. (I only did the one hand). The beauty of this is that you can do this as fast or as slow and careful as you want. If you try this out, I'd love to see it!
Supplies:
A dark base color
White polish
A range of different colored polishes. I chose a more "rainbow" palette
Fast Dry top coat
Torn Cosmetic Wedges
Base Coat
Dotting Tool
A strip of foil (for a palette)
Acetone/cleanup supplies
 |
| my pretties |
It's best to start with clean, dry nails. No matter how sad it makes you to see them in their naked state.
 |
| the horror. |
Step Two: Base Coat, Color, and Top Coat
I applied my base, one coat of China Glaze Liquid Leather, and a coat of Seche Vite. Who has time to wait for polish to dry these days?

Step Three: Start blotting!
Make a decent sized puddle of white polish on your foil. With your torn bit of wedge, (you get a more random look with torn as opposed to cut. personal preference though) blot your white polish diagonally across your nail. You don't want a completely straight line, however. Just a wandering cloud of white.

If you find that you are picking up too much polish, you can always add a little base coat, and blot against your foil.

Then lather, rinse, repeat with the rest of your chosen colors. I generally go from lightest-to-darkest, then I add a touch of white here and there to the top.

Once the color adding is complete, your "palette" will look something like this.

Step Four: Shaping
To give your nebular clouds depth and shape, take a clean bit of wedge and some black (or whatever color your base is) polish and blot around the edges. Precision is not important. If you cover too much, you can always go back and add more colors. When you have everything set, add a layer of top coat. If you are a messy kid like me, you'll be ready to do some cleaning up after this.

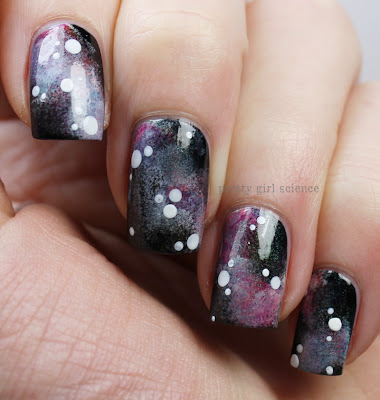
Step Five: Stars
Make a fresh puddle of white polish on your "palette". With your dotting tool, dip into the polish and make random little dots. Some people like to make little stars, but I never got the hang of that. You don't want to add too many, just a few clusters here and there. Less is more. I personally like to make them in pairs and trios, but you can do whatever makes you happy.

All done! Wait for a while to let the dots set up, then top with a thick layer of topcoat. You don't want your brush to touch the dots, or they'll drag. Which might be cool, if you applied the topcoat horizontally and vertically. I may try that next time.

Often, I add China Glaze Fairy Dust, a holographic polish, or some spectraflair topcoat here and there. It's up to you if you want glitter or sparkle. This was a quickie galaxy, so I didn't bother. I spent about 30 minutes doing this one, including photographs and dry time. (I only did the one hand). The beauty of this is that you can do this as fast or as slow and careful as you want. If you try this out, I'd love to see it!

this post originally appeared on Pretty Girl Science on 20 January, 2014 and is represented with permission of the original author...which is me.
Comments
Post a Comment